
There is another special file inside NTFS that also contains a wealth of historical information about operations that occurred on the NTFS volume, the Update Sequence Number (USN) journal file named $UsnJrnl.
While the different file operations occur on disk, in a NTFS volume, the change journal keeps record of the reason behind the operation such as file creation, deletion, encryption, directory creation, deletion, etc. There is a USN change journal per volume, its turned on by default since Windows Vista, and used by applications such as the Indexing Service, File Replication Service (FRS), Remote Installation Services (RIS), and Remote Storage. Nonetheless, applications and Administrators can create, delete, and re-create change journals. The change journal file is stored in the hidden system file $Extend\$UsnJrnl. The $UsnJrnl file contains two alternate data streams (ADS). The $Max and the $J. The $Max data streams contains information about the change journal such as the maximum size. The $J data stream contains the contents of the change journal and includes information such as the date and time of the change, the reason for the change, the MFT entry, the MFT parent entry and others. This information can useful for an investigation, for example, in a scenario where the attacker is deleting files and directories while he moves inside an organization in order to hide his tracks. To obtain the change journal file you need raw access to the file system.
So, on a live system, you could check the size and status of the change journal by running the command “fsutil usn queryjournal C:” on a Windows command prompt with administrator privileges. The “fsutil” command can also be used to change the size of the journal. Fom a live system, you could also obtain the change journal file using a tool like RawCopy or ExtractUsnJrnl from Joakim Schicht. In this particular system the maximum size of the change journal is 0x2000000 bytes.
 Now, let’s perform a quick exercise about obtaining the change journal file from a disk image. First, we use the “mmls” utility to see the partition table from the disk image. Then, we use “fls” from The Sleuth Kit to obtain a file and directory listing and grep for the UsnJrnl string. As you could see in the picture below the output of “fls” shows that the filesystem contains the $UsnJrnl:$Max and $UsnJrnl:$J files. We are interested in the MFT entry number which is 84621.

Next, let’s review MFT record properties for the entry number 84621 with the command “istat” from The Sleuth Kit. This MFT entry stores the NTFS metadata about the $UsnJrnl. We are interested in the attributes section, more specifically, we are looking for the identifier 128 which points to the $DATA attribute. The identifier 128-37 points to the $Max data stream which is of size 32 bytes and is resident. The identifier 128-38 points to the $J data stream which is of size 40-GBytes and sparse. Then we use the “icat” command to view the contents of the $Max data stream which can gives the maximum size of the change journal and then we also use “icat” to export the $J data stream into a file. Noteworthy, that the change journal is sparse. This means parts of the data is just zeros. However, icat from The Sleuth Kit will extract the full size of the data stream. A more efficient and faster tool would be ExtractUsnJrnl because it only extracts the actual data. The picture below illustrates the steps necessary to extract the change journal file.

Now that we exported the change journal into a file we will use the UsnJrnl2Csv utility. Once again another brilliant tool from Joakim Schicht. The tool supports USN_RECORD_V2 and USN_RECORD_V3, and makes it very easy to parse and extract information from the change journal. The output will be a CSV file. The picture below shows the tool in action. You just need to browse the change journal file you obtained and start parsing it.
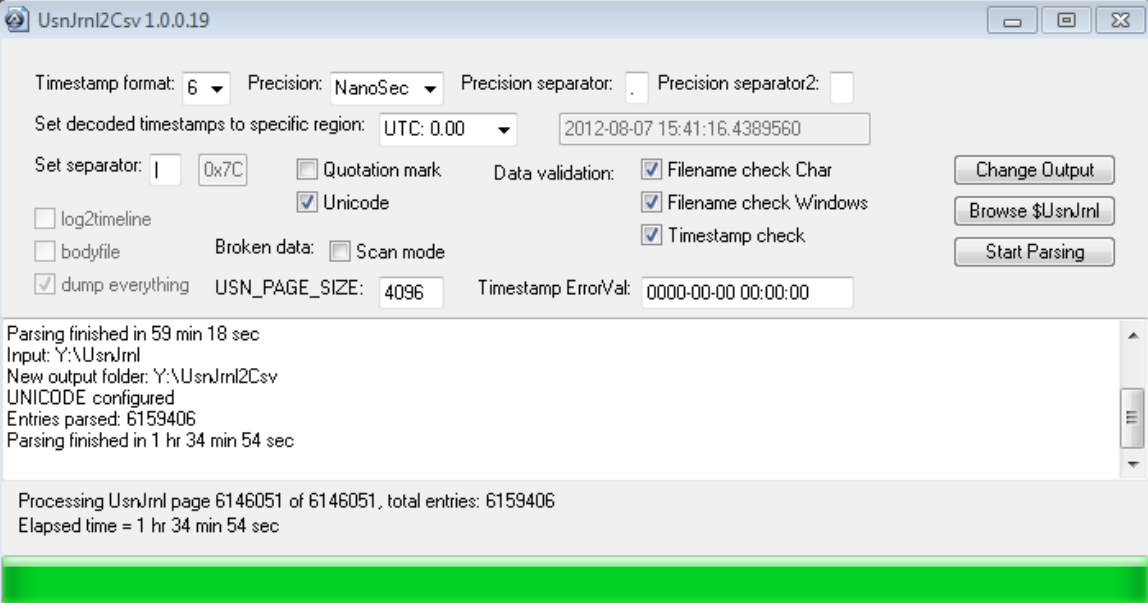
This process might take some time, when finished, you will have a CSV file containing the journal records. This file be can easily imported into Excel. Then, filter based on the reason and timestamp fields. Normally when you do such analysis you already have some sort of a lead and you have a starting point that will help uncover more leads and findings. After analyzing the change journal records we can start building a timeline of events about attacker activity. Below picture shows a timeline of events from the change journal about malicious files that were created and deleted. These findings can then be used as indicators of compromise in order to find more compromised systems in the environment. In addition, for each file you have the MFT entry number that could be used to attempt to recover deleted files. You might have a chance of recovering data from deleted files in case the gap between the time when the file was deleted and the image was obtained is short.

The change journal contains a wealth of information that shouldn’t be overlooked. Another interesting aspect of the change journal is that allocates space and deallocates as it grows and records are not overwritten unlike the $LogFile. This means we can find old journal records in unallocated space on a NTFS volume. How to obtain those? Luckily, the tool USN Record Carver written by PoorBillionaire can carve journal records from binary data and thus recover these records .
That’s it! In this article we reviewed some introductory concepts about the NTFS change journal and how to obtain it, parse it and create a timeline of events. The techniques and tools are not new. However, they are relevant and used in today’s digital forensic analysis. Have fun!
References:
Windows Internals, Sixth Edition, Part 2 By: Mark E. Russinovich, David A. Solomon, and Alex Ionescu
File System Forensic Analysis By: Brian Carrier
Source: https://countuponsecurity.com/2017/05/25/digital-forensics-ntfs-change-journal/
